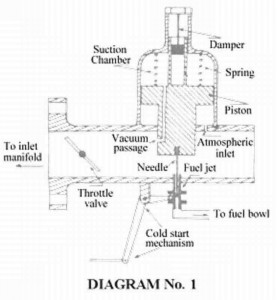
The simple SU carburettor – basically as air demand increases, the piston lifts up to maintain the air velocity & depression above the fuel jet. A small tapered needle attached to the piston protrudes down into the jet, and is gradually extracted to allow more fuel in to maintain the correct air/fuel ratio – simple really isn’t it !
The car engine is not so easily pleased though, it will demand a different fuel mixture for every change of revs or load, and every engine will have different needs (even the same engine in different models of the same car). To accommodate this, SU made many slightly different tapered needles & a selection of piston springs to suit each and every engine it is fitted to. This is where ‘simple’ gets ‘thrown out with the bath water’!
Even before I installed the 3.8 into my Mk2, I knew the carburettor needles would need altering, as I had made a few subtle changes to both inlet and exhaust systems from the original. Instead of blindly changing piston springs and buying a bunch of needles to find the magic combination (that’s a bit like buying a Tatts ticket), I tried to capture some data using 3 different sets I already had, and identify which “steps” (dimensions taken at 1/8” intervals down the needle) I liked / disliked, then look through the spec sheets for a needle profile to match the good bits. Surely with 123 of the little buggers to fit the HD6’s I can find at least one that’s suitable! I think it goes without saying that the carburettors must be good condition & with-in spec, and with EXACTLY matched piston springs before playing around with the needles otherwise you could just end up chasing your tail.
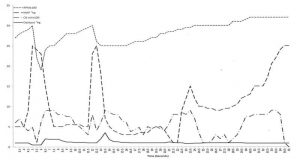
The chart below is a run with TU needles fitted – after much driving around with various instruments blue-tacked to the dash and video camera running I managed to get some useful data that included a couple gear changes and a stab at wide open throttle. (All within the speed limit I might add!) I should point out here that I am after a result for normal driving, not competition, so the short duration wide open throttle readings only need to be ‘safe’.
The top dotted line represents the engine revs; the next dashed line (with the couple big spikes in it) is from the MAP sensor, which reflects what my right foot is doing. The dot-dash line are the O2 sensors in the exhausts, but you need to read these with ‘a grain of salt’ as they really only indicate ‘too rich’, ‘too lean’ or ‘somewhere about right’, and even then I discovered the pair of brand new units I had purchased read differently to each other due to variations in ambient air temperature around them when they were fitted into the exhaust pipes– boy did that lead me up the garden path for ages! (Hmmmn – could be another article about that). The solid line near the bottom is measuring the vacuum in the dashpots, which can be used to calculate how high the needles are lifting, and where the dampers are creating extra enrichment. After changing needles and repeating the run I was able to determine which bits of each needle’s profile had merit.
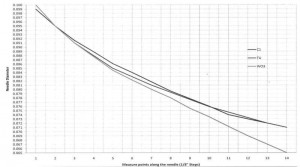
My observations from testing with the 3 needle profiles in the chart at left are as follows:
1) Idle was about at step #2 on all three – that made life a lot easier as I could swap needles without making a single adjustment to anything else – avoided confusing things.
2) C1 (late Mk2) is good at cruising, quite lean under slight to medium acceleration (very easy to induce pinging with my ignition at mid Rpm & wide open throttle) – TL’s (340, S type, XK150) has similar profile up to ‘step #4’.
3) TU (early Mk2) tends to be slightly rich at no-load cruising (just wasting fuel for no good reason) and leaned out under medium acceleration (can actually feel the engine going off song) but is Ok at wide open throttle, TL’s have exactly the same profile from ‘step #7’ on.
4) W03 (next richer to the TU from Midel) tended to be too rich except under acceleration – probably quite good for more spirited driving
Now all I had to do is to pick a needle from the profile sheets that matched the good bits. Unfortunately the needle numbers don’t appear to follow any particular profile sequence, and 123 needles with 14 measure points on each one = 1722 dimensions to digest – way too many numbers for this cat – even with me socks off!
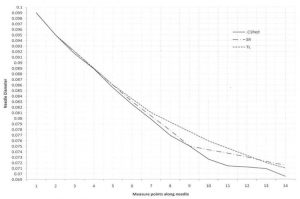
Eventually I typed every needle dimension into a spreadsheet so I could sort and group them by various steps and then selected a few to print the profiles out on a chart (similar to the previous chart) for easier reading. After all this data entry and analysis I still ended up with a ‘fist full of possibles’ to pick from – even staying within the range of needles fitted to other model Jaguars with 1 ¾“ SU’s didn’t reduce them much (but I did use these as a guide – reckoning that Jaguar have probably done more dyno testing of their engine than any other person in the world).
The next step was to sacrifice & re-profile the thickest pair (C1’s) into a shape I think is ok and then ‘short list’ the selection again. Although it’s not rocket science to polish a needle into another shape, it does require a delicate touch and some accurate measuring equipment. After fabricating a small jig to hold the needles exactly at each measure point, I then practiced comparing my readings with each needle’s chart. With multiple carburettors it is most important the needles be exactly the same – even if the diameter is out slightly to the chart.
A couple of simple rules:
1) You can take metal off, but can’t put it back on – so polish a little & measure a lot
2) Needle must always progressively taper – parallel bits are ok but might get some funny results though.
Measure point ‘step #12’ onwards doesn’t do much in the HD6s (in the role of fuel metering that is) as the piston doesn’t lift the needle that high, but they do need to continue the taper profile to prevent a restriction inside the jet tube.
So the final result of my experiment to date is a C1 over the first 4 steps, then dropping quickly towards a W03 by step #6, then flattening out towards the bottom end of a TU (got carried away and went a bit under – remember rule #1- but it’s most unlikely I will be driving around on the red line with foot ‘flat to the floor’ is it??) – Oddly enough, it’s not that far off a SR (XK140) profile in the mid range!
But (remember there is ALWAYS a “but”), any needle that looks good in my car for my driving style (commonly referred to as “BLOODY FELT HAT DRIVER”) may not suit another. Every slight variation to Dashpot springs, intake manifold, air cleaner/s, exhaust, ignition, coolant temperature, tires, colour of your undies, will have an effect on the needle profile. That’s why there are so many of the damn things.
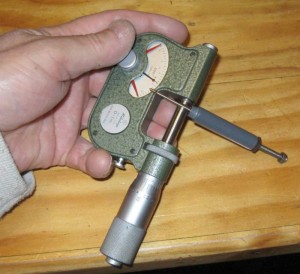
Indicating micrometer’s live anvil helps to prevent the hardened faces damaging the soft brass of the needles and is perfect for comparing needle pairs.
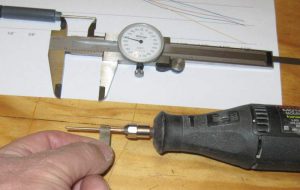
The higher speed of a Dremal will help produce a better finish.
I also investigated the effect of different fuel bowl levels – but I think that could be another article on its own!
– By Grant Rodman
![]()

