
E-type door not closing properly; do you have to lift it? I have the answer!
After 2 years of lifting it, banging it and fitting a new striker nothing seemed to be working. I know, I will ‘google it’ and, as usual, the answer was right there, why didn’t I do it in the first place! The answer, as if I didn’t know, was the door had ‘dropped’ and I needed to remove the hinge and fix it.
The article I found was from a UK company and gave all the instructions how to fix my problem. Rather than rewrite it all I will do a ‘cut and paste’ and add a few of my own comments along the way. I stupidly forgot to take my own photos, but I hope I have found sufficient to give you a good idea.
How are your door hinges holding up? When your door hinges become worn, getting your door to shut properly may become difficult. Try this. Open your door and pull upward on the end where the door handle is. If you can move the door up and down by a 1/8″ or more, (mine was about ½ an inch!) your hinges are probably worn. They can be refurbished without too much drama. Read on to see how.
Here are the tools you’ll need.
• Sockets and wrenches
• Metal grinder (die grinder, cutting disk, or Dremel tool)
• A drill motor and a ½” drill bit
• Sandpaper
• Hammer and punch
• Hacksaw
• Mig welder or epoxy glue
• 7/16″ and ½” adjustable hand reamers
The only new material you’ll need is a piece of ½” diameter steel rod.
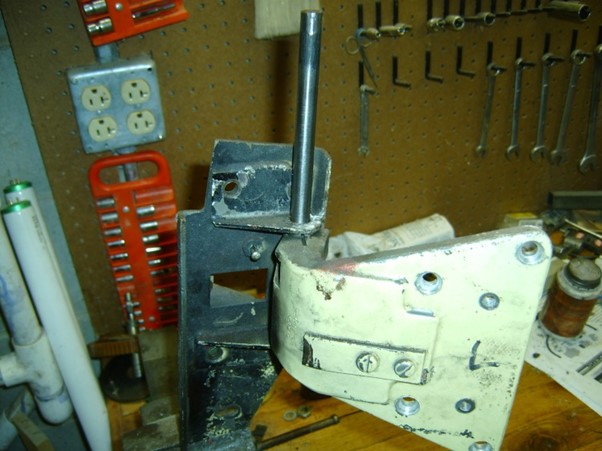
The first step is to remove your door hinge from the car. It would be wise to trace around the hinge with a marker to document its position. (On advice, I used a scriber, the line doesn’t rub off and is more accurate) The hex screws that fasten into the body forward of the door are readily visible when you open the door. The hex screws that attach the hinge to the door are only visible after you remove the trim panel. Be careful. The door is quite a handful and some assistance from a friend would be a good idea.
At this point, you should have the hinge apart from the car. Set it up on your workbench and give it a look. The centre section of the hinge attaches to the door and is made of aluminium. The outer part attaches to the car body and is made of steel. The pin is steel and the aluminium, being the softer material, gives up the ghost first. So, what we are going to do is extract the pin, enlarge the hole in the aluminium piece to ½”, fit a new pin, and put it back together.
Observe the ends of the pin carefully and you’ll see a bit of weld at each end. You are going to use your grinder to remove the weld. You’ll remove the end of the pin at the same time but that’s OK because the old pin is going into the trash anyway. The main thing is to not cut into the hinge plate too much. Little nicks and gouges are OK. When you’re done you should be able to drive the old pin out with a hammer and punch. The existing pin is 7/16″ in diameter so your punch should be a little smaller than that. Carefully note the position of any brass washers that may reside between the inner and outer hinge parts. Save the washers. When you get the pin out, you’ll will be able to work on the inner aluminium piece. But first let’s make your new pin. Take a piece of ½” mild steel rod. You can also you a ½” bolt but it will have to be long enough that you can cut off the head and the threads. Don’t think you need to get a Grade 5 or Grade 8. That will just make your job harder, and the bolt is not the weak link here, so get the garden variety kind.

Original Hinge after bead blasting. Weld of pin can be seen. This weld must be ground out to allow removal of the pin.
(Click to enlarge.)
Cut your new pin about a 1/4″ longer than the one you punched out. Test fit it next to the steel hinge just to be sure it will extend a small amount beyond each end of the hinge. Now, chuck the pin up in a drill and polish it up nicely by spinning it against some emery cloth/paper. Here is the only slightly tricky part. You need to enlarge the existing 7/16″ hole in the aluminium inner hinge to about ½”. But I don’t recommend using a drill bit as you will wind up with a sloppy fit. What we want to do is to carefully enlarge the hole so it’s a lovely glove tight fit to your new pin. And the tool for that job is an adjustable hand reamer. A reamer is an elegant little tool that gradually enlarges a hole. They have a set of cutting blades arranged around a central shaft. There are various types, but they all have the feature that they can be gradually brought to a larger diameter. They come in diameter ranges. You’ll need 2. One will straddle a range of diameters about 7/16″ and the next larger one will pick up where the last one left off and get you to ½”.
Your 7/16″ reamer can be adjusted down such that it falls through the existing hole. Open it up until you start to feel it cut when you rotate it within the hole. Go slow and gradually enlarge the hole. You spin it by hand using a wrench or a tee handle if you’ve got one. Some oil squirted into the mess will be a big help. As you reach the maximum diameter of the smaller reamer, you will move on to the larger one. As you get close to ½”, you’ll want to start test fitting your pin. It won’t go into the hole until it reaches the same size as the pin but when you get there the pin will start to go in grudgingly. Open the hole up just a bit more until the oiled pin slides through with just the force of your hands.
 New pin being inserted.
(Click to enlarge.)
You are over the hump and almost done. Use your ½” drill bit to enlarge the two holes in the metal outer hinge. The fit on these is not critical as you are going to weld or glue across any slop you may have. You might want to take a small detour and add a fresh coat of paint to the hinge parts. When you are ready, assemble the inner and outer hinge pieces and insert the pin so that it extends out equally at each end. Wait, did you save those brass washers that fell out when you took the hinge apart? You’ll need to open these up to ½” with a small round file and fit them in the same place you found them. If you have access to a Mig welder, add a little weld at each end to match what they did at the factory. Alternatively, a good dollop of epoxy at each end would also do the trick. (I am not sure epoxy would stand the test of time) And you are done!
Now all that’s left is to re-hang the door. Again, I would get an assistant to hold the door in position while you fasten it to the car body. Line up with your placement marks and trial shut the door. All of the hinge/bolt connections are sloppy so you can move the door up and down and in and out. You’ll get the hang of it in no time. Who knows, this may be the first time that your doors actually close without there being a wrestling match!”
So that is the article I used as a guide, now what really happened!
I first found a piece of ½” SS rod, cleaned it up and then removed the door after removing the inner lining etc and, with help, laid it on a well padded pair of trestles, then removed the hinge. All is good I thought, only to find somebody had beaten me to it and it was already fitted with a ½” pin and the securing welds had broken so the pin was rotating in the steel part of the hinge and not the aluminium part, no wonder the door had dropped! I guess the cause of this was poor lubrication and very substandard welding. So, next find a piece of 9/16” rod, yes got it, another piece of stainless. As I do not have a set of reamers I asked around and a friend Mike mentioned that he did have a set and it was agreed I would visit him and half an hour would fix it. Three hours later it was all done due to the pin’s diameter not being uniform, fortunately Mike also has a lathe so that was sorted. I returned home with the reamed aluminium part of the hinge and the new 9/16” pin that fitted but was tight, using some emery tape I polished the pin and with the application of some grease it fitted and rotated freely. After running a 9/16” drill through the steel parts of the hinge and remembering the brass washers that I had filed out, the job was reassembled and welded back up. Now to put the door back.
Hindsight is a wonderful thing, what I should have done on finding the previous welds had broken was to check if the replacement ½” pin was still a snug fit in the aluminium part of the hinge after cleaning it up and applying grease. If it had been, all I needed to have done was reweld it!! I think that is why it is called hindsight. Anyway, I haven’t finished yet.
Replacing the door was reasonably straightforward, I first re-bolted the hinge to the car using the scribed marks and the obvious paint outline. I then offered up the door to the aluminium part of the hinge and did a preliminary bolt up to see how it fitted and found I had to lift the back end of the door at least 5/8” to get everything lined up. I did this by using a high lift trolly jack and a well-padded piece of wood with the door half open and the bolts slacked off. It worked first time and after fully tightening the bolts and removing the jack the door closed perfectly, yippee; job done!
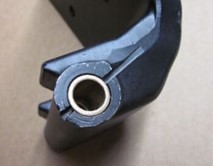
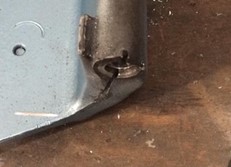
Wait for it, I still haven’t finished. Lubrication, nowhere in my reading of manuals etc. does Jaguar suggest how to lubricate the captive hinge pin, there is no grease nipple and even if there was, I doubt with the snug fit of the pin, it would be possible to squeeze grease into the hinge. However, when I took the hinge apart there was a noticeable groove cut into the top of the aluminium part of the hinge, see photos: (note the left-hand photo shows the aluminium part has had a bronze bush inserted)
(Click pictures to enlarge)
I can only surmise that this groove was put there by Jaguar to allow oil to be channeled between the captive hinge pieces so it can work its way down the hinge pin, that’s my theory and I am sticking to it! So, get the oil can out, it might not have been done in 40 years!!
Finally, some other alternatives to this job which really only cost me time and some great help from Mike:
Buy a new hinge from Barratt’s cost 260 GB pounds plus shipping about $600 Aus
A company in the US offers an exchange system for $170 US plus shipping so about $310 Aus
If you have any questions, contact me via the JCCT. – Charles
![]()